Saturday, September 26, 2009

The Couch

When we got here, we had to furnish our apartment.  Japanese furniture is typically a bit smaller and in some cases plainer than what we're used to.  We had trouble searching for desk chairs and desks, because the typical Japanese styles just weren't to our liking.  Few of the desk chairs were tall enough, and few had adjustable anything, so the lumbar support was more like upper hip support, and it just wasn't what Lee, who would be the main user of the desk chair, was interested in.  The desks are also a lot simpler than typical American desks, and it seems as though most Japanese either use laptops or just don't have desktops.  Few offered keyboard trays, there were almost no built-in monitor stands, and no desks in the local stores had designated areas for your tower or holes for cables.  We finally found a western style desk on Amazon.jp and chose a chair from the local home furnishings store.


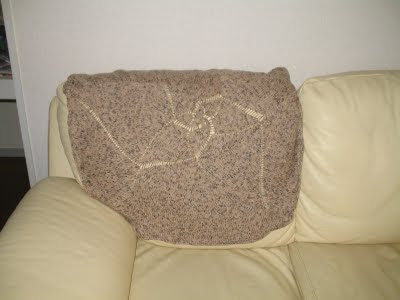
Our couch, however, was even more difficult.  We went to all of the local stores that might sell couches.  Most of them were too low to the ground and had very low backs.  The ones that were taller typically also reclined, and so had much larger price tags than we wanted, especially if it's only going to be used for under five years.  We also went to the secondhand stores, and finally decided on a couch that was fairly comfortable and sized better for us, but in a color that Lee did not like  It's more yellow than the picture shows, more of a lemon sorbet than a butter color.  We found that the Japanese do not understand the concept of a couch cover as we understand it and will put a sheet over their couch if they want it covered.  This did not cover it quite the way we wanted it to.  I said I'd make a couch cover if he wanted, so we'd end up with a nice, comfortable, customized couch for under $500, plus some work on my part.


Lee and I purchased quite a few meters of fabric for this.  Since I was making a custom slipcover, we may as well have it be truly custom and give it some personality.  We chose mostly brown fabric, since everything in that area was already brown (and about 7 different shades already), and got an interesting rabbit print on a lighter brown fabric as an accent.  To make the couch look even more professional (and to hide uneven seams) I bought cording to go around all of the major edges.  Now that all the supplies were together, I was ready to start.


This couch cover and I, we had quite the relationship.  First off,
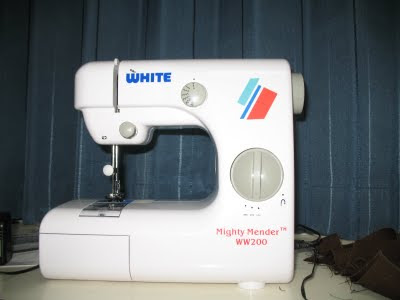
the couch is, of course, not a simple shape.  The cushions are not detachable and most of the edges are curved.  I brought a sewing machine to Japan, a Mighty Mender that I hadn't used too much in the past.  I soon found that it was not up to the task.  The tension for some reason never stayed where it was set.  It would loosen or tighten itself while you were using it, and it had one exact sweet spot, an area of about 5 degrees along the dial, that it would sew evenly in.  This spot changed due to the vibrations of using the machine, so I'd have to spend more time finding the right tension than sewing a single seam.  It was worse than the servo motors in the robotics class at RIT.


So, I got a new one!  A lovely Jaguar
X300, on sale at Amazon.jp, and it came with a sewing kit of many different colors of thread, bobbins, pins, scissors, measuring tape, and a hard case that is quite useful.  This machine is a Japanese machine, but quite intuitive with many pictures in the manual.  It did not come with a foot pedal, and I was thrown at first.  It is automatic - it tensions itself automatically, runs when you push the start button and stops when you push it again, has quite a few different stitches for pretty much anything you'd want to do with controls for stitch width and length, and is just generally a good value.  With this machine, I crafted the slipcover.  Well, all but the last ten inches when the new machine had some mechanical problems.


After months of working on the slipcover, some mistakes requiring a seam ripper and patience, and many, many, many measurements, I finally finished the slipcover.  In the image to the left, I accidentally made two left halves for the couch.  Riiiiiiiiiiip!  For the most part, I am happy with it, especially since it's my first major sewing project and there were no patterns for it.  I followed some tutorials and have an excellent guide, the Reader's Digest Complete Guide to Sewing from the '70s, but due to the shape of the couch, they really weren't much more than starting points.  Well, starting points and in the case of the book, an excellent resource for many of the techniques I used.  I'm not 100% pleased with the sewing job; there are a couple of multi-seam joins in crevices that might not quite join correctly, there is extra stress on some of the corners due to the way the cushions move when we're both sitting on it that might tear the seam out, and it wrinkles easier than I'd like, but all in all, I'm happy with it.  It covers the yellow that wasn't too appealing and is some pretty darn good amateur work if I do say so myself.


Sunday, September 13, 2009

LBU Swap

I participated in an awesome swap where we swapped bookmarks.  The ones my swapper sent me are away somewhere - I think they're all in use actually - and I'm too lazy to go find them, so I'm just going to show the one I made.  I love this bookmark; it's adorable, simple, and really quick to work up.  If I ever have a reason to make another bookmark, I'd go to this one immediately.  I hope the swapee likes it as much as I do!

 
Pattern: Spider to Web Bookmark (Ravelry)
Yarn: Wister LaLa Baby, Japanese yarn in white
Hook: USE/3.5 mm
Timeframe: June 21, 2009, maybe an hour or two.
Mods: None.  Excellent pattern.
Problems: Only my rusty crochet skills, which weren't actually that bad!

Friday, September 11, 2009

Sample Knitting for Indigo Moon

Right now I'm doing a bit of sample knitting for Indigo Moon.  The yarn is not the softest I've used, but it seems like it will wear like iron and comes in amazing, vibrant colors.  I love this stuff.  It has excellent stitch definition and is wonderful to work with.  I'm knitting three pairs of socks for Indigo Moon, and the size I've been asked to knit is also my size.  You have no idea how much I want to wear the first pair or two until I finish the third and have to send them back!


So far, I've knit one Chains of Love in West Coast Musings, a lovely two-tone dye series of 100% superwash Merino wool, color West Coast Sunset and am nearly finished with the first Blackrose sock in Tonals, a nearly solid dye series of the same 100% superwash Merino wool base, in Turqoise.  I'm doing one sock at a time for multiple reasons, one being that if I finish the Chains of Love I'll be sorely tempted to wear them, and two being that Chains of Love calls for a long leg, and while I weighed the yarn to make sure I could knit the full 8" leg, I want to re-weigh* it before starting the next one, just to be on the safe side.  I could handle re-knitting if I need to at this point, but if I have the second sock nearly done, I would be crushed.  And might miss the deadline.  Due to the twists in the cuff, I don't think I'd be able to just cut off the cuff of the sock and knit it back on (though I probably could cut in two places and graft it...) to fix the problem of a too-long leg, so I'd much rather find out now.  I also do not own a good scale for weighing yarn, so have to use the one at the Post Office or elsewhere, and of course I left work just late enough the Friday I finished it to be unable to stop in to weigh it.


These are pretty generous skeins.  The listed weight and yardage is 100g/370 yards, but I'm fairly certain at least the West Coast Sunset was larger.  I weighed the 6.5" sock leg to see if I would have enough to make an 8" leg with the 10" foot, and figured as long as it was near 90g I could do it.  There were 96g left.  Only a 100g skein with 96g remaining after a 6.5" leg?  I doubt it!  I should have weighed the leg to see what the actual weight was, but I didn't want to deal with taking out the DPNs or weighing those separately and doing math.


These would be going a lot faster if I didn't knit the entire heel flap and half of the heel turn incorrectly with the first one, and then completely screw up the last two repeats of the lace panel on the Blackrose sock.  Of course, it was a small error, I knitted the wrong two stitches together on either side, but due to the lace pattern, I had to rip back all but the center three stitches to fix it.  So, I ripped down the entire 17 stitch panel, one DPN, and am midway through knitting it back up so I can finish it and make the second sock.


So far, I am very pleased with the way everything is coming out and cannot wait to see how it knits up in the final pair of socks, in West Coast Musings, color Wildberries, in a Cookie A pattern.  Should be great!

*I weighed the yarn, first sock is  57.8 g, ball for second is 61.2 g, nearly 120 g skein!  I wonder if all skeins are so generous or if she knew she wanted the 8" legs for this one...I shall have to weigh the other two to find out!

Tuesday, September 8, 2009

Sample Knitting for The CraftsMeow

I knit a single Lobster Pot Sock (by Chrissy Gardiner, oh how I love her patterns) for CraftsMeow.  This yarn, Banana Split in Kamikaze, is an amazing superwash merino/bamboo yarn that I've fallen in love with.  The color is amazing, the feel luscious, and at $20 per skein, I may just have to pick up a few next time I have extra yarn money!  This would be a big thing for me, as the most expensive yarn I've ever bought for myself has been just over $15 for a pair (with $5 shipping each in a sock club), and I don't tend to buy myself sock yarns often.  I've only gotten KnitPicks Essential and Cascade Heritage for myself, along with the wonderful Abstract Fiber sock yarn club, but will have gotten 16 skeins of yarn, minimum, in August, September, and October.  Three skeins to knit up and send back as samples, four skeins as payment for samples I've already received, six skeins I'll be getting as payment, and three skeins from the club.  I really shouldn't buy more; I'm supposed to have almost no yarn stash by the time I leave Japan...but that's at least two years from now, and this yarn was just so soft and wonderful, I may break down and get some!

Back to the project.  This sock took me about nine days, I think a week of knitting and two days to get it washed and blocked.  I thought it would take longer, with the cabling, but I enjoyed working with it so much I just blasted through it. 


Pattern: Lobster Pot Socks (Ravelry)
Yarn: The CraftsMeow Banana Split in Kamikaze
Needles: US1.5/2.5 mm
Timeframe: June 8 - 17, 2009
Mods: None.  Sample knit, so pattern had to be followed to a T.
Problems: The yarn bled a little, but that's to be expected with such a great blue.

Loved the yarn, loved the pattern in the yarn, was really happy with the whole thing and would love to knit it again.  In fact, I might, even though I never really liked this pattern (at least, not enough to make socks for me with it), I love it with this yarn!

Saturday, September 5, 2009

Lap Blanket

This one's been in the sidebar for awhile (and the post has been a draft for nearly as long at this point!). It's a test knit I did a couple of months ago, and is pretty cool. I used the nest o'yarn I showed off before as a bit of a spoiler. Regarding that nest of yarn - do NOT recycle a thrift store sweater and then try to wind it all around the niddy noddy. Not cool. Not easy to deal with later. It looked like Big Bird had been hanging out at our place, and left his nest by our bed.


This is an awesome blanket based on naturally occurring spirals. It's great for babies or for your lap. I keep the blanket at work for when it's cold. Here in Japan, all the women have blankets at their desks. They also always wear skirts, but it's amusing to me that it's totally acceptable for women to have blankets at their desks.


I love the clean edges next to the YOs. The decreases look marvelous, and the way the knitting swirls around - I'm looking at the blanket more than my work!  If you want an interesting lap blanket for the geek in your life (could be yourself even) or for the spawn of a geek in your life, I highly recommend this one.  Awesome, simple design, something you can get into the rhythm of and just go.  Fairly quick knit as well.  I didn't do the best job of blocking it into a circle.


Pattern: Helix (Ravelry)
Yarn: Recycled 100% wool sweater from GoodWill, nearly half.
Needles: US9/5.5 mm
Timeframe: January 1 - 31, 2009, one of the first projects of the new year.
Mods: None.  Test knit, so pattern had to be followed to a T.
Problems: Only user error in skipping a YO or K2tog in a couple places.  Fairly mindless pattern, but you still have to pay a little attention!  Stitch markers, they are useful here.

Tuesday, September 1, 2009

Another One Bites The Dust

I finished the ornaments! Now I just need a place for them to go.  As usual, I have supplies left over.  I think I will just toss the extra bit of plastic canvas, because really, I will not be doing much with plastic canvas, and if I do, I have a large piece in my crafting stash.  I was hoping to use the yarns for felting designs onto things, maybe making very simple hats and felting a cute design on them for my sisters for Christmas, but alas, they are acrylic.  I suppose I could embroider the designs on, but I was really hoping to felt them, and the bright colors would have been perfect for such a use.  Thus far, they are knotted by color and are hanging out in my scraps bag.  Too much to toss, too little to be of much use.  Maybe I'll make some of those glass ball ornaments for Christmas and use that for inside...


Ornaments on my mini tree, how cute!

Details: Bucilla kit from forever ago, threw out the pertinent info in a happy dance after completion!
Materials: Acrylic yarn and cotton thread on plastic canvas, tapestry needle that came with the kit.
Timeline: Approximately 3.5 years.  I bought them my third year in college, fall I think, and I believe I tore into them right away, because they were new! shiny! and looked quick and easy at first.


With this finished, and still in the throes of the cross stitching bug, I have moved on to the Mickey Mouse and Fireman Art of Disney cross stitch.  I'm going with this one next because out of the two Art of Disney designs I've started stitching, this one is smaller, even though it is not as far along percentage-wise.  It's 16" x 20" frame size, but only161 x 224 (36,064 total) stitches versus the Past, Present, Forever design which is an 18" x 24" frame size with about 220 x 265 (58,300 total) stitches.  More than 50% more stitches because there is almost no "white" space (non-stitched seafoam green canvas) while in the first one there is a lot of white space.


I've mentioned before the issues I've had with this one.  There was some sort of dyeing error, or they just put the wrong color in for one of the colors.  Along with the correct color; I wouldn't have noticed if it had been all the incorrect color.  I know that Stoney Creek is really good about sending additional thread if you run out or if there is a problem, but since I needed so
little, the postage would have cost more than just getting it when I was at Jo-Ann Fabrics.  The kits list the DMC thread color for everything, so finding the correct thread color was not a problem.  DMC's dye lots are so consistent that everything that was already stitched in the old color matched so well I have no need to rip and re-do.  I did need to figure out which of the two colors was incorrect, and since I'd used both in the piece already, rip out all of the incorrect areas.  Luckily for me, out of the seven strands of DMC 370, three were incorrect, and I'd caught it before using two of them.  I didn't use it for the blended areas, just some of the plain areas, so was able to take that out and re-stitch.  See the one that is more brown versus the greener color?  The brown one is incorrect.

Of course, I ripped out the problem section and started right in before taking a picture of the now correctly stitched canvas, so here's a picture after I took out the incorrect thread and added the fireman's helmet.  There's also more yellow on the jacket, the same yellow that is used in the helmet.  Sad to take out so much work, but it wasn't as bad as it could have been, so not too many complaints.  I'm passed it, and it's been re-stitched already.  At this point, I'm quite far along since I just haven't wanted to work on either of my non-traveling knitting projects.  I have my Absinthe in my purse for when I'm out and about, and then an alpaca lace stole and stranded sport-weight wool.  Both patterns, while not actually complex, are more complex than I'm interested in, and the deliciousness of the fibers is not so amazing in the summertime.  I'm on the torso of the cardigan, so a lap full of thick wool is not appealing, and while I love the lace and beading, the alpaca is just a bit sticky while I'm sitting on the couch sans air conditioning.  I don't think I'll be finishing the cross stitch this year, since I have some more sample knitting to attend to once it arrives in the mail, but any progress is good progress, so I'm happy to keep on going while the mood stays!